Live Photos on iPhone are more than still images. They capture a short moment of movement before and after you press the shutter. This makes photos feel more alive and expressive. Many people don’t realize that these Live Photos can be turned into GIFs without installing any extra app.
With the built-in Photos app, iOS makes this process quick and beginner-friendly. Below is a clear and easy guide that explains everything in simple language.
Also read: How to Edit Videos Inside WhatsApp on Android and iPhone
What You Should Know First
- Live Photos already contain motion data
- iPhones can convert Live Photos into GIF-style animations
- No third-party apps are required
- Loop and Bounce effects work best for GIFs
- GIFs are saved automatically in a separate folder
Converting a Live Photo into a GIF Using the Photos App
You can do everything directly from your iPhone. Just follow these steps carefully.
Step 1: Open the Live Photos Album
- Open the Photos app on your iPhone
- Tap Albums at the bottom
- Scroll down until you see Live Photos
- Open the folder and select the photo you want
Every Live Photo includes a short video clip, which allows it to be animated.
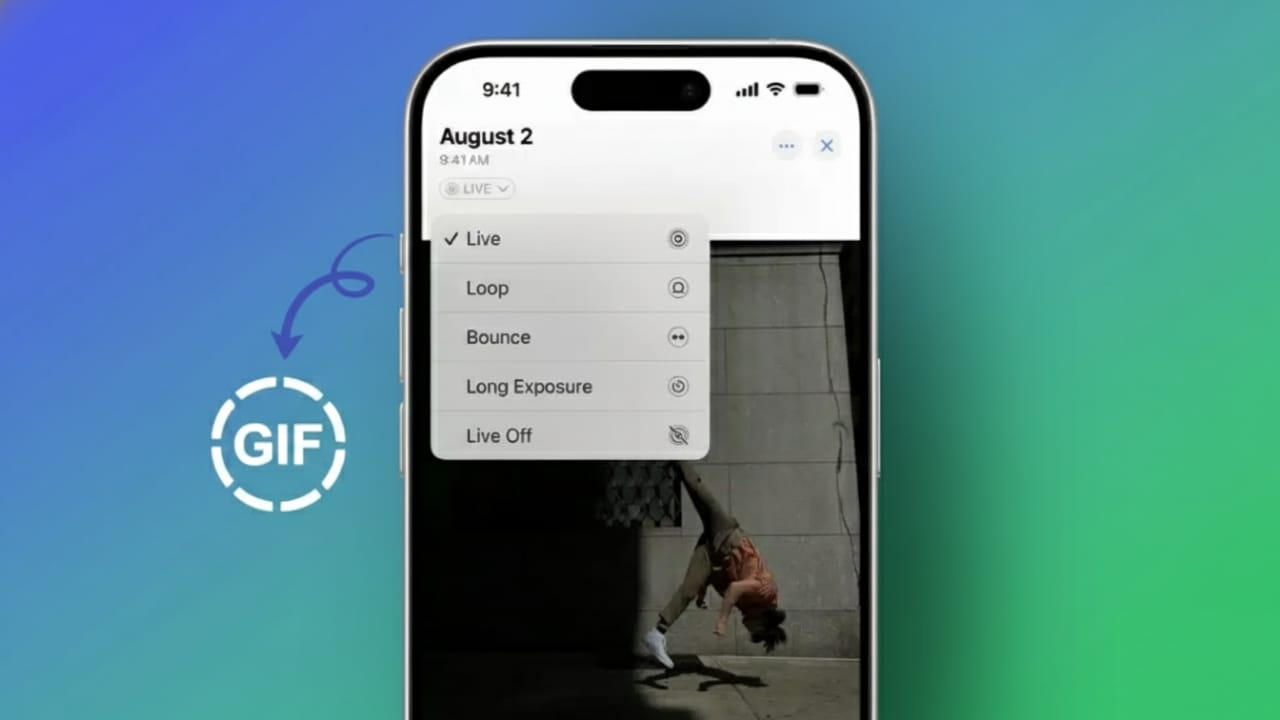
Step 2: Open Animation Options
- Tap once on the selected Live Photo
- Swipe up gently from the center of the screen
- A panel with animation options will appear
You will see different effects that change how the photo moves.
Step 3: Choose an Animation Style
iPhone offers several animation effects. Each one behaves differently.
- Live: Shows the photo as originally captured
- Loop: Plays the motion repeatedly from start to end
- Bounce: Plays forward, then backward, again and again
- Long Exposure: Creates a blur effect (not a GIF)
If your goal is a GIF, choose Loop or Bounce. These two options create smooth, repeating animations.
Once you tap an effect, the animation updates instantly. There is no save button. The iPhone saves it automatically.
Where the GIF Is Saved
After applying Loop or Bounce:
- iOS stores the animation in the Animated album
- You don’t need to move or rename the file
- The photo stays organized automatically
This makes it easy to find your GIFs later.
Editing Your GIF Without Losing Motion
You can still improve the look of your GIF after converting it.
Available editing options include:
- Adjusting brightness and colors
- Applying built-in photo filters
- Cropping the image
The animation remains intact while editing. This helps you polish the GIF without breaking the movement.
How to Share the GIF Correctly
Sharing is important because the method you choose affects the format.
Best Way to Share as a GIF
- Open the Animated album
- Select the animated photo
- Tap Share
- Choose Email
Email sends the file as a true .gif. This format works on almost all devices, including Android phones, Windows PCs, and web browsers.
Important Tip to Avoid Losing Animation
If you share a Live Photo normally, it often sends as a regular image. This removes the motion completely. Always share from the Animated folder when you want the GIF to stay animated.
Also read: How to Clear WhatsApp Call History on Android and iPhone (Easy Guide)
Final Thoughts
Turning Live Photos into GIFs on iPhone is easier than most people think. Your iPhone already has everything you need. The built-in Photos app handles animation, editing, and storage smoothly.
Loop and Bounce effects give the best results for GIFs. Editing tools help enhance the look without affecting movement. Sharing through email ensures the animation works everywhere.
With just a few taps, anyone can create and share GIFs from Live Photos—no apps, no technical skills, and no confusion.

Abhi Rajput, founder of EarnAbhi.in, is a tech lover with 6+ years of experience in SEO, digital tools, and smartphone troubleshooting. He writes simple, clear, and useful guides to help people solve real tech problems.