Live Speech is an accessibility feature from Apple that allows your device to speak text that you type. Instead of using your own voice, you simply type a message and your device reads it aloud.
This feature was originally created to help people who have difficulty speaking due to medical conditions. However, it can also be useful in everyday situations. For example, it can help when you are recovering from surgery, dealing with temporary voice strain, or trying to communicate in a very noisy place.
With Live Speech, your iPhone, Mac, or Apple Watch can instantly convert written text into spoken words. This makes communication easier when speaking normally is difficult or not possible.
Also read: How to Block or Unblock Someone on WhatsApp
What Is Live Speech?
Live Speech is a built-in Apple accessibility tool that converts typed text into speech in real time. Instead of talking, you type what you want to say and the device speaks it out loud.
The feature works across different Apple devices and can be used in many situations, including:
- Regular phone calls
- FaceTime conversations
- Supported communication apps
- In-person conversations using the device’s speakers
Live Speech can also work together with Personal Voice, another Apple feature that allows you to create a digital version of your own voice. When used together, the spoken output can sound more personal and natural.
How to Enable and Use Live Speech on iPhone
Using Live Speech on an iPhone involves three simple steps: turning on the feature, activating it with a shortcut, and typing your message.
Step 1: Turn On Live Speech
- Open Settings on your iPhone.
- Tap Accessibility.
- Scroll to the Speech section and select Live Speech.
- Turn the Live Speech toggle on.
After enabling it:
- Tap Add Preferred Voice
- Choose your language and voice style
- Adjust the rate and pitch if needed
You can also add saved phrases so that commonly used messages can be spoken quickly during conversations.
Step 2: Activate Live Speech
Press the Side button three times quickly.
This will open the Live Speech interface on your screen.
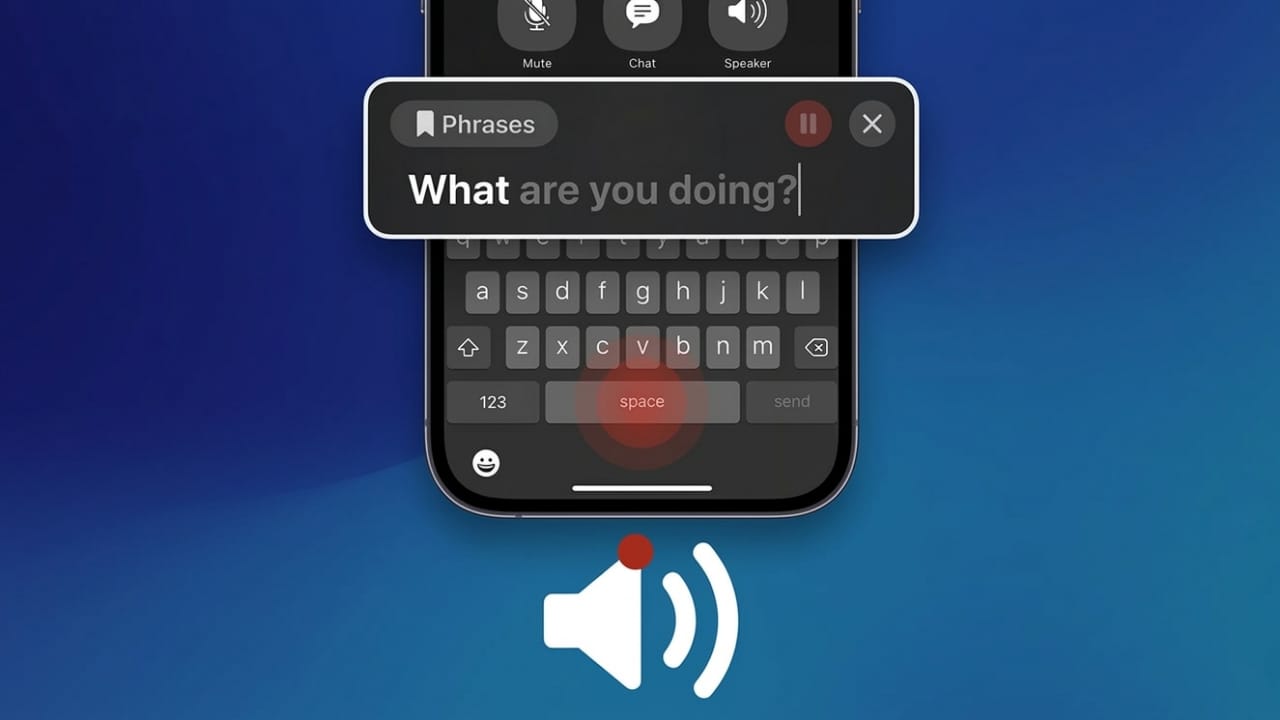
Step 3: Speak Using Text
Once the Live Speech panel appears:
- Tap one of your saved phrases to speak it instantly.
- Or type a new message in the text box.
- Tap Send, and your iPhone will read the message aloud.
This works during calls, FaceTime chats, or when speaking to someone nearby.
How to Use Live Speech on Mac
The process on a Mac is very similar to the iPhone setup.
Step 1: Enable the Feature
- Open System Settings.
- Click Accessibility in the sidebar.
- Select Live Speech under the Speech section.
- Turn the feature on.
After enabling it, a Type to Speak bar will appear at the top of the screen.
You can then:
- Choose your language and voice
- Adjust the text size
- Save common phrases for quick use
Step 2: Activate Live Speech
On Mac, there is no extra shortcut needed.
Once the feature is turned on, the Live Speech panel stays visible at the top of the screen until you disable it.
Step 3: Use Live Speech
To use it:
- Click a saved phrase to have it spoken immediately.
- Or type a new sentence and press Return.
Your Mac will instantly convert the text into speech through its speakers.
How to Use Live Speech on Apple Watch
Live Speech also works on Apple Watch, with a simplified interface designed for the smaller screen.
Step 1: Enable Live Speech
- Open Settings on the Apple Watch.
- Go to Accessibility.
- Tap Live Speech and turn it on.
Then:
- Select Add Preferred Voice to choose language and voice.
- Add saved phrases for faster communication.
You can also configure this feature using the Watch app on your iPhone.
Step 2: Activate and Use It
- Press the Digital Crown three times.
- The Live Speech screen will appear.
You can then:
- Choose a saved phrase, or
- Type a new message for the watch to speak.
How to Create a Personal Voice on iPhone or iPad
If the built-in voices don’t feel natural, Apple offers a feature called Personal Voice. This allows you to create a digital voice that closely matches your own.
To set it up:
- Open Settings.
- Go to Accessibility.
- Tap Personal Voice under the Speech section.
- Select Create a Personal Voice.
You will need to:
- Verify using Face ID or your passcode
- Choose a language
- Record several phrases by following the on-screen instructions
Once the process is finished, your personalized voice can be used inside Live Speech.
Practical Uses for Live Speech
Live Speech can be helpful in many real-life situations, such as:
- Speech-related medical conditions
- Recovering after throat or vocal surgery
- Temporary voice loss or strain
- Communicating in loud environments
- Professional meetings where clarity is important
- Situations where speaking may not be convenient
Limitations to Keep in Mind
While Live Speech is useful, there are a few things to remember:
- Typing speed matters – slower typing means slower responses.
- Apple Watch typing can be slower for longer messages.
- Voice quality depends on the selected system voice.
- Personal Voice setup requires a quiet environment for accurate recordings.
Also read: How to Turn Off Autoplay on YouTube (iPhone, Android, Desktop, and TV)
Final Thoughts
Live Speech is a helpful tool that makes communication easier when speaking normally isn’t possible. Because it works across iPhone, Mac, and Apple Watch, you can use it in many different situations.
When combined with saved phrases and Personal Voice, the feature becomes even more practical and natural to use.
If you have an Apple device, trying Live Speech can be a simple way to improve communication whenever voice use is limited.

Abhi Rajput, founder of EarnAbhi.in, is a tech lover with 6+ years of experience in SEO, digital tools, and smartphone troubleshooting. He writes simple, clear, and useful guides to help people solve real tech problems.