Live Captions is a helpful accessibility feature from Apple that turns spoken words into on-screen text in real time. Once enabled, you can read what people say during calls, video chats, or media playback. It’s especially useful in noisy places, during unclear conversations, or for anyone who prefers reading along.
This guide explains what Live Captions do, which devices support it, and how to turn it on and customize it—step by step, in simple language.
Also read: How to Fix Discord Not Connecting to Xbox (Simple Step-by-Step Guide)
What Are Live Captions?
Live Captions listen to spoken audio and display it as text on your screen while the sound is playing. A small caption box appears and updates instantly as people talk. It works during phone calls, FaceTime, and supported audio or video apps. It can even transcribe your own voice if you choose.
Apple introduced Live Captions with recent system updates to improve accessibility. At the moment, the feature supports English.
Supported Devices and Requirements
Before you start, make sure your device is compatible and updated.
Supported iPhones
- iPhone 11 and newer models
Supported iPads
- iPad (8th generation or later)
- iPad mini (5th generation or later)
- iPad Air (3rd generation or later)
- iPad Pro 11-inch models
- iPad Pro 12.9-inch (3rd generation or later)
Live Captions are available with iOS 16, iPadOS 16, or newer versions. Mac support depends on the latest macOS release with Live Captions included.
How to update your device
- Open Settings
- Tap General
- Select Software Update
- Install the latest version if one is available
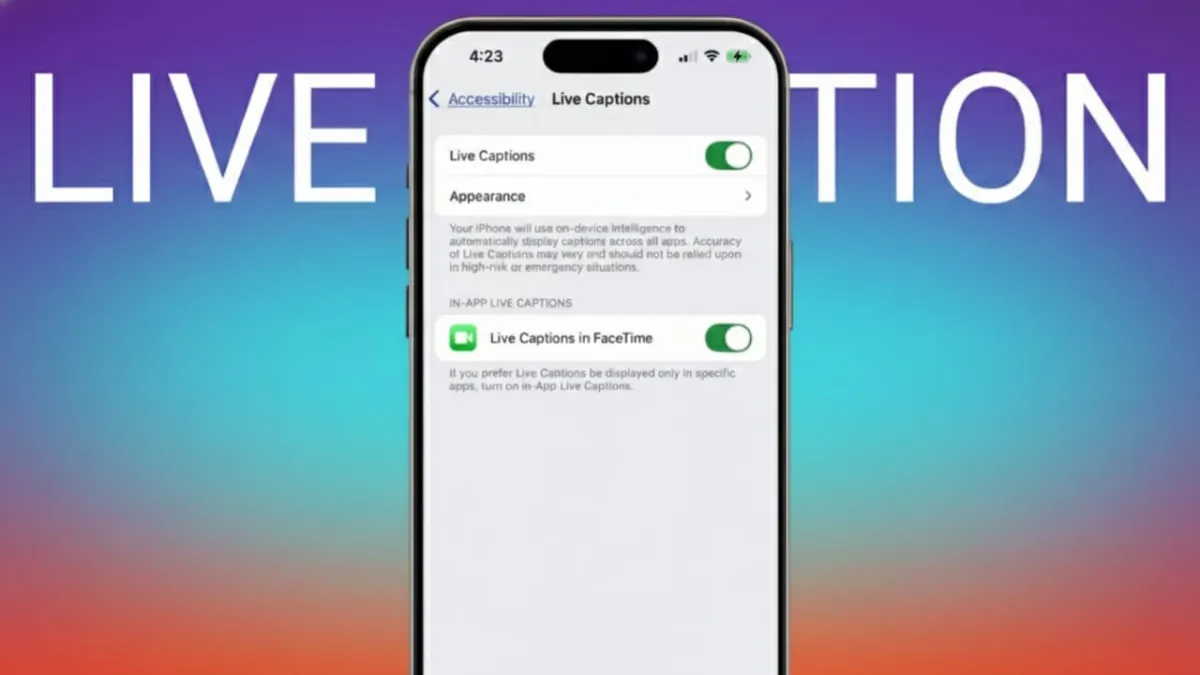
How to Enable Live Captions
Live Captions are turned off by default, so you’ll need to enable them manually.
- Open Settings
- Tap Accessibility
- Scroll to the Hearing section
- Select Live Captions (Beta)
- Turn on the Live Captions switch
You’ll also see options to allow Live Captions during:
- Phone calls
- FaceTime calls
- RTT (if you use it)
Turn these on if you want captions during those activities.
Using Live Captions on Your Screen
Once enabled, a caption window appears near the bottom of the screen whenever speech is detected.
The caption box includes simple controls:
- Hide: Minimizes the caption window
- Pause: Temporarily stops captions
- Microphone: Transcribes your own voice
- Expand: Shows captions in a larger, full-screen view
You can drag the caption box anywhere on the screen. Use the expand option if you want to read longer conversations more comfortably.
To manually start captions, tap the microphone icon and begin speaking. Tap pause if you want to stop, and tap the microphone again to continue.
Using Live Captions During Calls
Phone calls
- Enable Live Captions before calling
- Start a regular phone call
- Spoken words appear on screen as text
- Use the expand view for easier reading
FaceTime and other apps
- Make sure the FaceTime option is enabled in Live Captions settings
- Start a FaceTime call
- Captions appear automatically during the conversation
- Many supported VoIP apps work the same way
Customize the Look of Live Captions
You can adjust how captions look to match your preference.
- Open Settings
- Go to Accessibility
- Tap Live Captions (Beta)
- Select Appearance
From here, you can:
- Turn on Bold Text
- Change text size
- Choose text color
- Change background color
- Adjust idle opacity (controls how visible buttons are when not in use)
There’s no live preview, so it’s best to test changes while captions are active.
Quickly Turn Live Captions On or Off
Using Accessibility Shortcut
- Open Settings > Accessibility
- Scroll to General
- Tap Accessibility Shortcut
- Select Live Captions
Then add it to Control Center:
- Go to Settings > Control Center
- Find Accessibility Shortcuts
- Tap the + icon to add it
- Reorder if needed
Now, swipe down from the top-right corner and tap the Accessibility Shortcut to turn Live Captions on or off.
Using the Shortcuts app
- Open the Shortcuts app
- Tap the + button
- Tap Add Action
- Search for Live Captions
- Choose Set Live Captions (Beta)
- Set it to Toggle
- Save the shortcut and add it to your Home Screen
Tap the shortcut icon anytime to enable or disable captions quickly.
Also read: How to Start Using ChatGPT: A Simple Guide for Beginners
Final Thoughts
Live Captions on iPhone, iPad, and Mac make conversations easier to follow by showing spoken words as text in real time. They work during calls, video chats, and media playback, and you can customize how they look and behave.
Just make sure your device is updated, follow the steps above, and adjust the settings to your comfort. With Live Captions turned on, you’re less likely to miss important words—no matter where you are.

Abhi Rajput, founder of EarnAbhi.in, is a tech lover with 6+ years of experience in SEO, digital tools, and smartphone troubleshooting. He writes simple, clear, and useful guides to help people solve real tech problems.